Sunday, January 1, 2012

Making up for lost time GateFold Mini Album TUTORIAL!!!

Well, you may have guessed or already know that I have had a rough few months. After pneumonia, I never quite recovered and have been down for the count!
However, this gives me lots of time to surf the web (when I am awake, but not moving around)
I found this really awesome 'Scrapbook' made from 6x9 mailing envelopes and thought. I LOVE it.
I could not find the person on YouTube that she was saying made it... so I copied hers... and here it how I did it!
This is my first, and the Tutorial is a really ROUGH draft!
This one is for a friend, so it doesn't have all the stuff added in yet... I wanted her to be able to add her personal touches and pictures etc. But... I have all the elements for stuffing it that the original has!
Click on Photos for enlargement. 

Find all the stamps I used at Our Daily Bread Designs!


TUTORIAL on how to make your own pretty!!!!!!!!!!!!!!!!!!!!!!!!!!!!
Mini Gatefold Album with Envelopes.
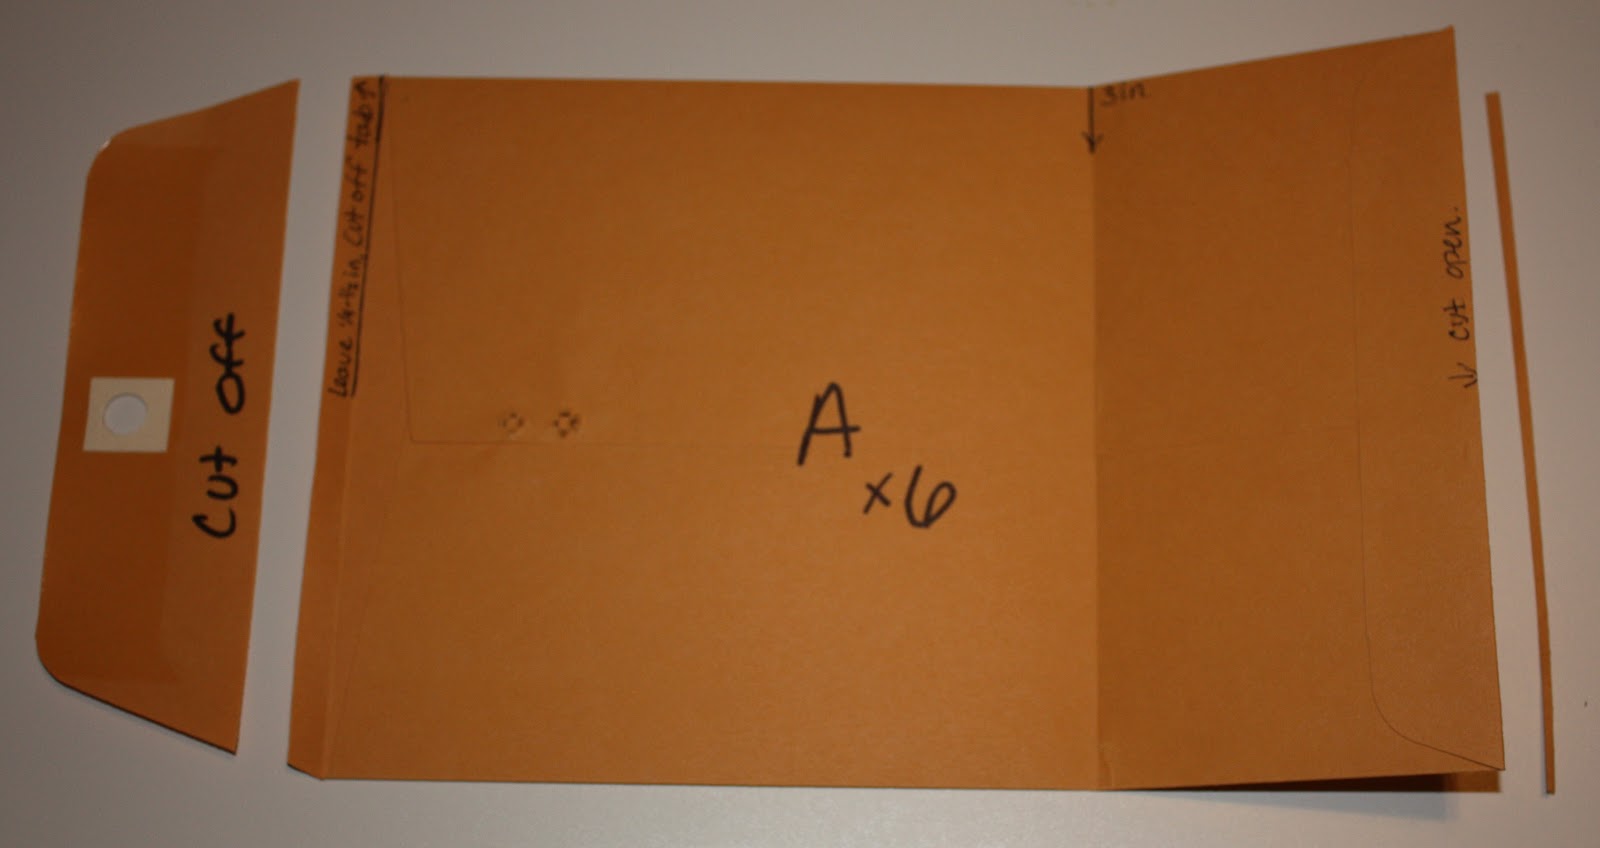
Step One: Cut your envelopes. You need the 6x9 Mailing envies. I pulled the metal tab off.
Cut 6 off them the way the picture shows. Trimming of the sticky closure edge creating a TAB with the 1/4-1/2 inch that is leftover, and a sliver at the fold to created an opening. Score at 3in. This will be Envelope A. 
Also Cut One Envie the same way but score at 1in, 3in and 2.5in. This will be Envelop B.
And one 3 inch piece for the cover.
6 Envelope A's
1 Envelope B
1 3 inch cover piece
 Step 2: Start at the back. Fold Envelope B's 2.5 inch parts and Glue one A's tab to the inside of the opening. creating a back piece that is 9 inches long, 3 inches from envelope B, and 6 from an A. And a folding flab from B, and one on the right side from A.
Step 3: Glue an A to the back of 1A's right flap.Leaving both tab and 3in flap both free. Not sure why the pic came out sideways... not the way I took the photo!
Step 4: Glue the back of 3A to Envie B, leaving tab and 3 in flap both free.
 Step 5: Glue a 4th A's back to the tab of 2A. Leaving 4's tab and flap free.
Step 6: Cut the tab off a 5th A and glue the back to the tab of 3A. Leaving the 3in Flap free. 
Step 7: Cut the tab off a 6th A and glue the flap to the flap of 5A. If you would like to mimic the one in the video, You would glue a 6.9 Envie that had been scored at 3 and 6 for three 3in accordion folds or similar.
Step 8: Close 6A creating cover and add 3 inch piece to tab of 4A to create right side cover.
Cover your Album, and Embellish.
This Tutorial shows the Project without a chipboard cover... like the one in the video. However, mine has one. I used masking tape and chipboard to make a flexible covered (then covered it in paper)  and glued the back of the album into it. Simple as could be.

Thursday, October 13, 2011

Altered Box and a Card!

One of my favorite Crafty activities is to participate in Secret Sister Swaps!
I REALLY miss my local South Carolina group, and Secret Sisters' we use to have! So, Fun!
I recently joined in on one in the SplitCoastStampers group.
Here is my Altered Shoe box that I filled with goodies, Black & Red theme. And my card to reveal myself to my sister!
 Amazing Sentiment from Paper Makeup Stamps.
 Silver fairy Digi from Wee Stamps
 Altered Shoe box.

Wednesday, October 12, 2011

Journal, Journals, Journals!

This week I finished 4 journals!
Phew! Go me! 
I have some more fun projects to show you this week as well!
some are for purchase in my Etsy Shop!


Thanks for peeking in! Each journal is handstitched with imitation Sine, using a suede or leather remnant! Stamped with staz on ink. This batch were mostly Unity stamps!

Friday, October 7, 2011

Paper Makeup Stamps Monster Bash

Monsters, Monsters, Monsters!
I love Monsters, I have three that live in my house... 2 cookie monsters, and a Potato Chip Monster.
The Monster's From Paper Makeup are the best Monsters around. 
Now I may be slightly biased. But if you are making your way through this hop then you know!
♥
I come from a family that shows love with food. Baked goods, fresh tortillas, Tamales, Baked Goods.... if we love you, we will make you something to eat, and you will likely get fat.
I sure do miss making Katie eat my creations!!!
So here is my Love Inspired Monster!

This Monster has the right Idea! A Cookie never killed anyone, never broke your heart...have another!
Paper piecing adds such a great dimension, really brings your little monsters to life! I added a little dimension to my cutey, by piecing the hat, gloves and cookies... bet you couldn't even tell! It just pops a little more.
♥ ♥ ♥


A Note From Katie: 
Today we have having a MONSTER of a Hop!!! Who doesnt love an ugly cute little monster?!

The Paper Makeup Artists, some of the Digi Artists and some of PMS's bestest fans are joining together to bring you fun monster cards using Paper Makeup Stamps!

And in honor of this hop, all monsters on the site will be on sale for 1 week using the voucher code MONSTERHOP, of 15% off!

So settle down, grab your beverage of choice and prepare to be scared, um, we mean, inspired! 
Get Shopping already!
Our Hop Line up!

Wednesday, October 5, 2011

Sitcky fingers....

I MAY have mentioned previously that I was unmounting my last hold outs - the wood mounted Stamping Up!
Now that SU has the clear mount option.... I am getting rid of the block!! I am putting all of my sets into the SU dvd cases. 
There are a few ways I have found that look tedious, involving tissue paper and glue and what not. I am strapped for time! So, I am ripping the rubber off the block, tracing it on the sticky side of the EZ mount - with the paper on... cutting out the shape, still with the paper on the EZ mount, then using a block that has tack n peel on it, to stamp in Staz On on the NON sticky side of the ez mount (paper off). Then I stick the rubber to the sticky side and now it has an index. TaDa.

Also... that EZ mount sure is pricey! So, I switched to the mount found at Stampers Best!
You should give it a try if you are unmounting!
Annnddd....
Use coupon code SuburbanCrafter for 10% your order... makes it an even better deal!!!
I like the uniformity of having all my SU in the DVD cases, and I like having the inserts that go in them to match as well.
If you do too, you have to check out this thread where you can print out lots of great set templates!


Sunday, October 2, 2011

Keep it Crafty!

I have been Up and Down with my health! But I am trying to keep it crafty!
I decided to unmount a large amount of stampage... so that has taken up some time!
I have a cousin who is getting married and she showed me some hair pieces that she said were $116... I told her to put the brakes on that... we can definitely make those! Duh... you crafters know what I mean.
So here is my sample for her.

These huge flowers are really in this season! I am working on some sewing projects as well! So, I am not doing to bad on keepin it crafty!

Monday, September 5, 2011

My Elegant Angel.

This is my first card, in a very very long time.
I have been trying to get back on the craft wagon... but it has been hard since I have been on all my medication.
My Granny loves Angels, so I thought I would start by sending her some Angel cards. She always loves any card I send, it doesn't have to be good. :)
Today is my Dad's Birthday. So, an Angel is appropriate today. 

Close-up!

This is Stampin Up ELEGANT ANGEL. She is colored with Copics, the inside is pretty as well, with the beautiful sentiment that comes with stamped inside. I will try to snap a pic of that and add it.

Friday, August 19, 2011

Long Dry Summer

Summer has had its ups and downs for me. I am hoping I am all straightened out for Fall!
My boy goes back to school on Monday... tear... I will miss his smiling face all day.


I have a job lined up teaching at JoAnn's this fall. So, I will keep busy. Plus my 2 year old is still at home... so we will be busy bees. : )

Here is a peek at what I have been up to while I was under the weather recently. Gotta keep my hands busy!! 


Yep, I was sick for a while. I have 3 others I did as well! phew. Glad to be up and moving about again. 
You can purchase these journal at Arelia's Pretties!

Tuesday, July 19, 2011

Ooo wee Baby!

What a long long looong month it has been!
I spent some time in the hospital, and currently have pneumonia! Go ME! 
What is new though! I am so use to it, it hasn't stopped me yet!

Well, it does slow down the crafty business! hahah I thought I would show y'all some of the cutey patootey earrings I am making for the Arelia's Pretties Etsy store! 


Fun right??? Well, hop on over to the Arelia's Pretties Facebook page and enter for a chance to win a free pair!!!

Wednesday, June 15, 2011

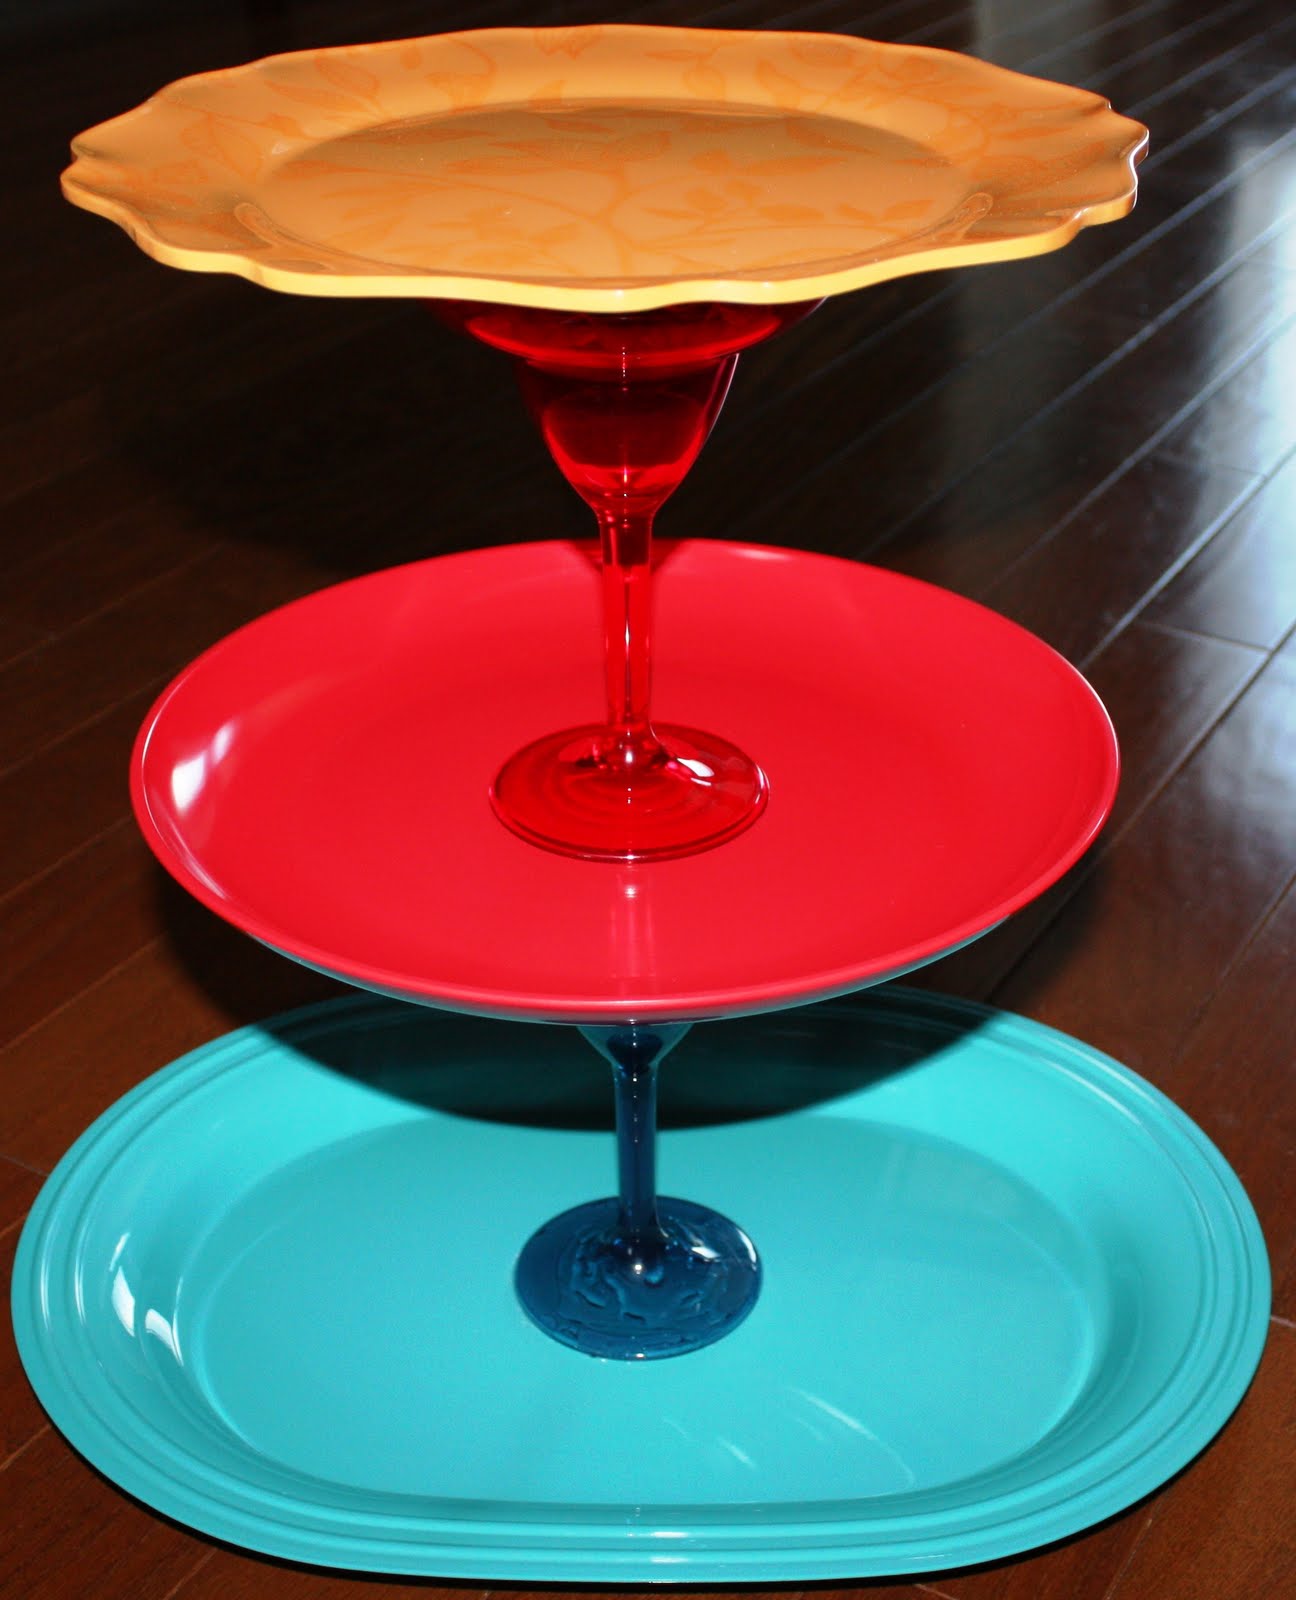
Summer Cupcake Stand!

Love Cupcakes??
My kids are all about cupcakes this summer!
We made this cupcake stand for our neighbor and family friend who has a big do over 40th Birthday coming up!!

I picked up all of the pieces at Walmart in their summer seasonal dishes display, each were around a $1.


The top is piece is not glued, for easier storage. And for optional two cakes on top etc, or a different look.

I used E6000 glue, it was 2.47 at walmart. I stuck a big geranium in the top glass.
I put glass pebbles in the bottom glass, for weight and decor! Such an easy project. I didn't paint it or anything fancy. My kids LOVED the way it turned out and they want one for our house!

Sunday, June 12, 2011

CheeseCake Cuppycakes

Who loves Cheesecake? You will love these cupcakes. I like to make the mini ones. 2 Bite size Delights!


Filling/Frosting
8oz Cream cheese at room temp
1/4 cup Sugar
1/2 tsp vanilla
1/2 tsp lemon juice
1 cup heavy cream whipped to stiff peaks.

Beat all but cream together until well creamed. Fold in cream gently. Refrigerate for 1 hour. Fill bag, and pipe into center of cupcake and top cooled cupcake.

Crust/Bottom of Cuppycake
3/4 cup Graham Cracker Crumbs (or you can use chocolate cookies!)
3 TBS butter
3 TBS brown sugar
Mix well and press one spoonful into bottoms of cupcake liners.

Topping
1/4 cup strawberry preserves
3 TBS sugar
Mix well and  microwave for 30 seconds. After cooled drizzle on cupcakes - or use chocolate instead.

Cake- or use a box mix
1 cup sugar
1/2 cup butter
2 eggs
2 tsp vanilla
1 1/2 cups flour
1 3/4 tsp baking powder
1/2 cup milk

Press bottoms of cupcake liners with graham cracker crust, fill with cake mix and bake for 15-18 minutes at 350. Let cool. Pipe filling into center of cupcakes and top with a generous portion. Drizzle with topping.

Monday, June 6, 2011

Soaring Heart Small Journal

 Small Soaring Pocket Journal. I love making these journals. They are hand stitched and not difficult to put together. They make great gifts.
The metal stud is used as the closure with wrapped imitation sine and a leopard bead.

Listing is found here: http://www.etsy.com/listing/74225377/soaring-heart-suede-pocket-journal

Tuesday, May 31, 2011

Missing Our Granny!!!

Granny came to visit. She was sad when she came (that is why she came!), but no one can be sad for long when Arelia is around. Granny and Arelia spent every second together. They are both ornery as ever.
When the weather cools down here in Texas, we are hoping Granny will come back.

We are mailing these to her for her little Memory Book!! Along with some goodies we made for her!

 Granny & Arelia!
Arelia dancing for Granny!!! :)

Friday, May 27, 2011

After a brief intermission.

Posting after a brief intermission. I had to make a short visit to the Hospital. The friendly staff tried to keep longer than I wanted to stay... but I am home now and feeling better.
My Takayasu's Arteritis was acting up, and I had to get under control asap!

My Daughter has recently decided she is a Fairy Princess. We had a fabulous time making these Fairy WINGS, WAND and TUTU together!!!!
Flower Wand with dollar store flower, Simply hot glue to a foam ball 6 for a $1 at dollar store and shove onto a dowel covered in ribbon Dowels 10 for .98 at Walmart!
 TuTu: Elastic From Walmart, Tulle From Walmart, Ribbon from Walmart. I followed these Instructions: HOW TOOOOOOO It is Pinker than it looks in the picture.
 Wings: .35 cent knee high nylons in white, Home Depot Wire (way cheaper than craft store, look by the nails) $5 for more than you could ever need, unless you have to make a thousand pair, like I do. I copic Airbrushed using a Mask made by Cricut Cartridge Rock Princess. Flowers from the Dollar Store.
I followed this How to!

Friday, May 13, 2011

My Craft Room

I haven't posted a whole lot lately... My craft room was being painted and then I was slightly ill, so I took my time getting back in order.
I have some re-organizing still to do. But I am happy with the color. not something I would put anywhere else in the house. But that is indeed the fun of having your own craft room. 
Too bad I took my pics at night!

 Arelia and I chillin, I have a cool post in which we MADE her tutu, wand and wings!!! Stay tuned fellow mothers of princesses.

Copic Station, minus my air compressor, I keep that under my desk away from tiny fingers that like to turn it on and off.  There is a HUGE closet full of more stuff to the left there. Shhhh, don't tell. It's a walk in with shelves and stuff... so fabulous!
 Where I keep my Arelia's Pretties Jewelry, while in stock in the store and between shows.
 Cricut storage, stamps of all kinds magazines and other buggie machines!

 Entrance to the room, Jewelry making, sewing and leather journal area to the left. copic station and jewelry display to the right.
My Desk. Paper, tools and more.
Thanks for hanging in my room today. Hope you visit again soon!!!

Tuesday, May 10, 2011

Celtic Cross Journal

You may have viewed my previous post for my Sister... she went off on a trip to Ireland WITHOUT me!!
The nerve she has. Well, I know she had the trip of a lifetime.
And being that I could not be there, I thought I could make her some mementos that she could journal her pics and memories in. 
I made her this gorgeous suede journal in her favorite color.
 Small Celtic knot book marker. Cat eye closure.
This book was hand stitched and has gp110 with distressed edges.
The Cross is from Our Daily Bread Designs.