Well, you may have guessed or already know that I have had a rough few months. After pneumonia, I never quite recovered and have been down for the count!
However, this gives me lots of time to surf the web (when I am awake, but not moving around)
I found this really awesome '
Scrapbook' made from 6x9 mailing envelopes and thought. I LOVE it.
I could not find the person on YouTube that she was saying made it... so I copied hers... and here it how I did it!
This is my first, and the Tutorial is a really ROUGH draft!
This one is for a friend, so it doesn't have all the stuff added in yet... I wanted her to be able to add her personal touches and pictures etc. But... I have all the elements for stuffing it that the original has!
Click on Photos for enlargement.
TUTORIAL on how to make your own pretty!!!!!!!!!!!!!!!!!!!!!!!!!!!!
Mini Gatefold Album with Envelopes.
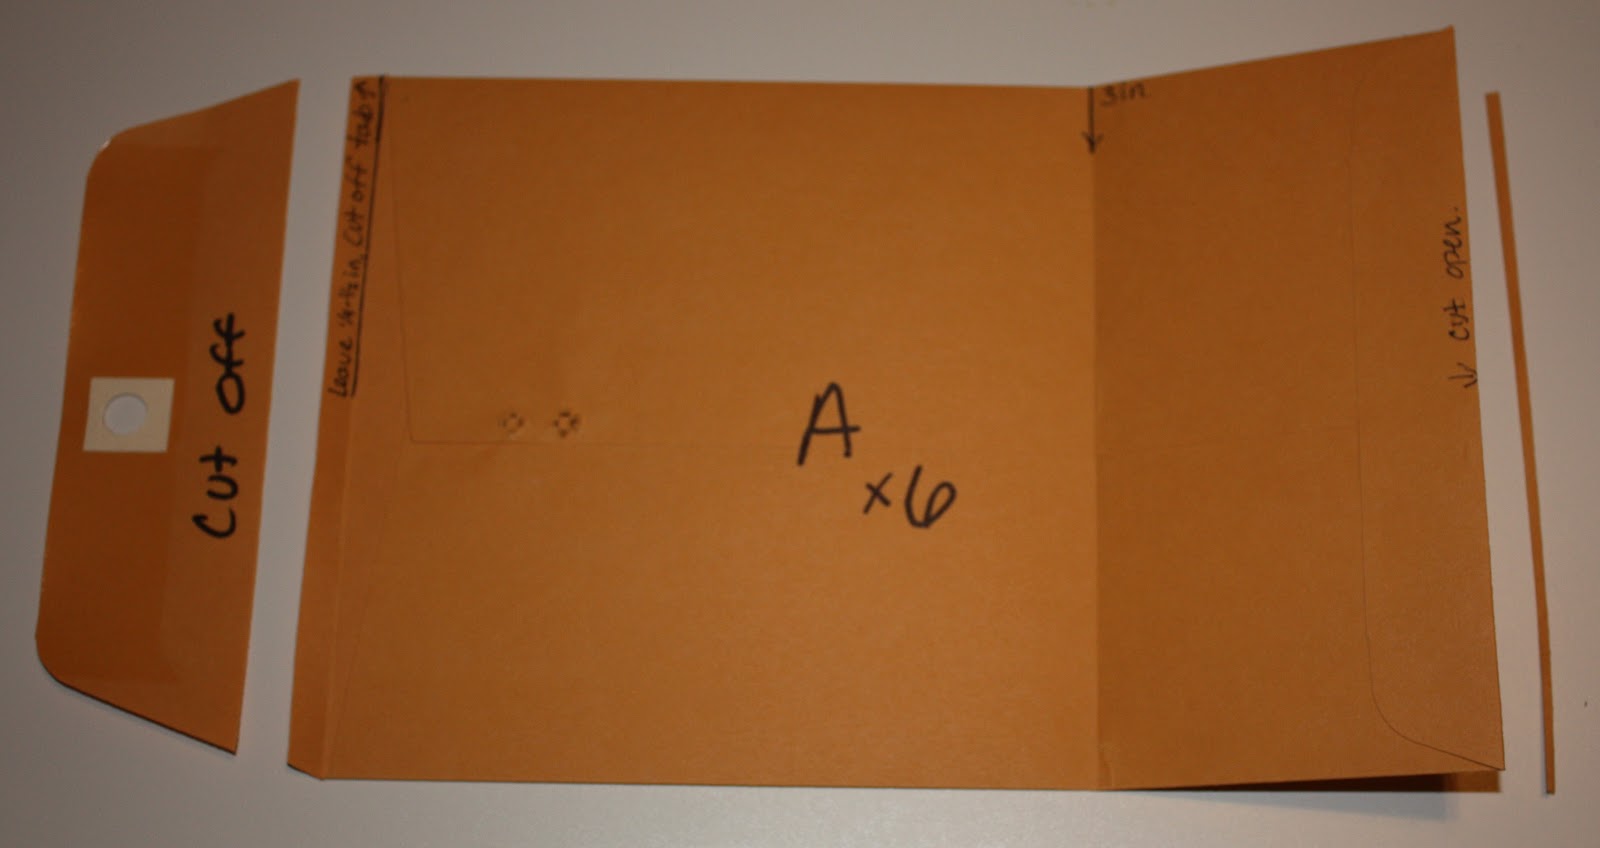
Step One: Cut your envelopes. You need the 6x9 Mailing envies. I pulled the metal tab off.
Cut 6 off them the way the picture shows. Trimming of the sticky closure edge creating a TAB with the 1/4-1/2 inch that is leftover, and a sliver at the fold to created an opening. Score at 3in. This will be Envelope A.
Also Cut One Envie the same way but score at 1in, 3in and 2.5in. This will be Envelop B.
And one 3 inch piece for the cover.
6 Envelope A's
1 Envelope B
1 3 inch cover piece
Step 2: Start at the back. Fold Envelope B's 2.5 inch parts and Glue one A's tab to the inside of the opening. creating a back piece that is 9 inches long, 3 inches from envelope B, and 6 from an A. And a folding flab from B, and one on the right side from A.
Step 3: Glue an A to the back of 1A's right flap.Leaving both tab and 3in flap both free. Not sure why the pic came out sideways... not the way I took the photo!
Step 4: Glue the back of 3A to Envie B, leaving tab and 3 in flap both free.
Step 5: Glue a 4th A's back to the tab of 2A. Leaving 4's tab and flap free.
Step 6: Cut the tab off a 5th A and glue the back to the tab of 3A. Leaving the 3in Flap free.
Step 7: Cut the tab off a 6th A and glue the flap to the flap of 5A. If you would like to mimic the one in the video, You would glue a 6.9 Envie that had been scored at 3 and 6 for three 3in accordion folds or similar.
Step 8: Close 6A creating cover and add 3 inch piece to tab of 4A to create right side cover.
Cover your Album, and Embellish.
This Tutorial shows the Project without a chipboard cover... like the one in the video. However, mine has one. I used masking tape and chipboard to make a flexible covered (then covered it in paper) and glued the back of the album into it. Simple as could be.


